DRM-X 4.0 LearnDash LMS (WordPress) Plugin
DRM-X 4.0 supports encrypted video, audio and PDF. DRM-X 4.0 protected courses can prevent screen recording, display user information watermark, and bind user devices to prevent sharing accounts. Through this plugin, you can easily integrate DRM-X 4.0 system with your WordPress LearnDash system seamlessly. Protects WordPress courses from piracy and prevents LearnDash courses from recording.
File Description
DRM-X 4.0 Integration Core Files
• drmx_index.php DRM-X 4.0 integrated index file, it will get DRM-X 4.0 encryption parameters. • drmx_login.php Verify user login information and course orders, call DRM-X 4.0 integration interface to add users, update Rights, and get licenses. • drmx_licError.php Show the error encountered when obtaining a license. • licstore.php Storage of acquired licenses. • includes/drm_nusoap.php Third-party nusoap class file to call DRM-X 4.0 XML Web Service interface. • public/css/login-style.css DRM-X 4.0 Integration Style files for pages. • public/images/ DRM-X 4.0 Integration Get license page image folder.
Plugin core files
• drmx-integration-learndash.php Plug-in registration file. • drmx-integration-learndash-settings.php Plug-in settings page.
How to use the plugin?
I. Set DRM-X 4.0 parameters in the plugin
1. Install and activate the plugin
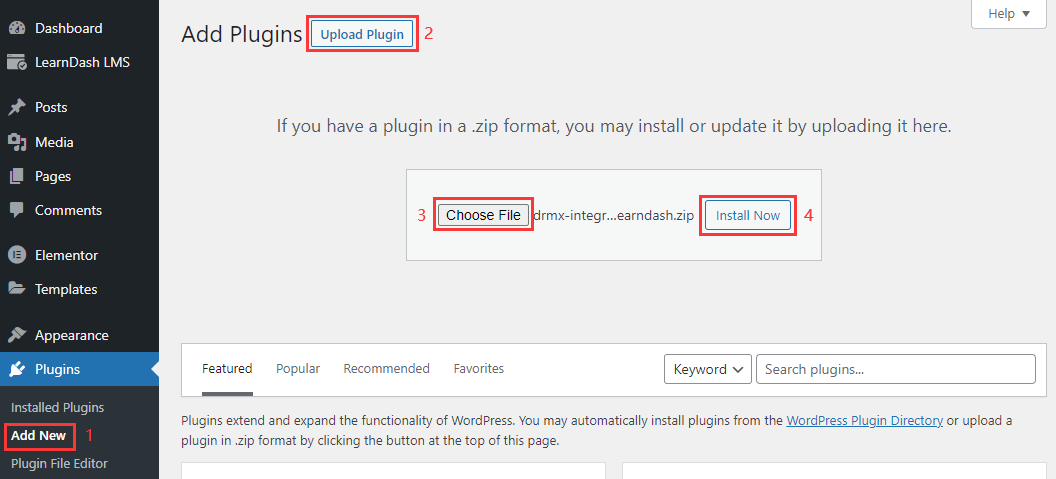

2. Visit the plugin settings page
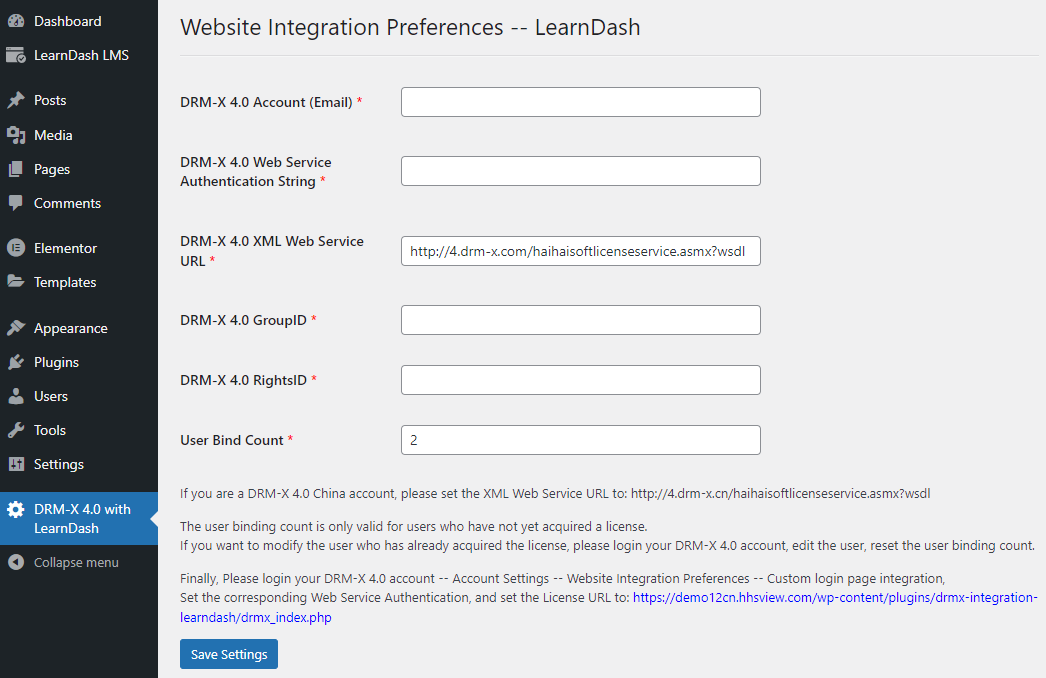
3. Set the DRM-X 4.0 parameters
DRM-X 4.0 parameter description:
• DRM-X 4.0 Account: The email address you entered when you registered your DRM-X 4.0 account. • DRM-X 4.0 Web Service Authentication String: Visit the DRM-X 4.0 website integration settings, Select custom login page integration and set a Web Service Authentication String for DRM-X web service. Then enter the same Authentication String in the "DRM-X 4.0 with LearnDash" plugin settings page.
• DRM-X 4.0 XML Web Service URL: DRM-X 4.0 system XML Web Service interface URL. • DRM-X 4.0 GroupID: The User Group ID of your DRM-X 4.0 account, please login to your DRM-X 4.0 account and visit the User Group page to check it. You only need to create one user group, please do not delete the user group in your DRM-X 4.0 account after setting. • DRM-X 4.0 RightsID: The Rights ID of your DRM-X 4.0 account, please login to your DRM-X 4.0 account and visit the Rights page to check it. You only need to create one Rights, please do not delete the rights in your DRM-X 4.0 account after setting, users will automatically update the Rights when they get the license, and get the updated Rights. • User Bind Count: Hardware binding restrictions for student login accounts. The user binding count is only valid for users who have not yet acquired a license. If you want to modify the user who has already acquired the license, please login your DRM-X 4.0 account, edit the user, reset the user binding count.
II. Associate LearnDash courses with DRM-X 4.0 License Profile
1. Create or edit LearnDash courses
Get the course ID through the URL "post" parameter in the browser address bar, the value of the "post" is the course ID.

2. Create the corresponding DRM-X 4.0 License Profile for the course
Login to your DRM-X 4.0 account, visit the License Profile page, and create a License Profile that belongs to the course.
• Profile Name: We recommend that the License Profile name be the same as the course name. • Default Rights: Select any one of the Rights. • ProductID in your system(Option): Set the ID of the corresponding course here, which is the post id viewed in the first step.
Finally, select License is Revocable below and click the Submit button.
3. Protect Course Videos
Visit the DRM-X 4.0 Protect Files page, select the License Profile (course) of the video you want to protect, and complete the protection.
How to encrypt video and PDF files?
4. Upload the protected video
You can upload the protected video to your WordPress web server, or to a separate video storage server. But it must have an absolute URL to be embedded in Xvast online player. For example: https://www.domainname.com/videos/xxxxx_P.mp4
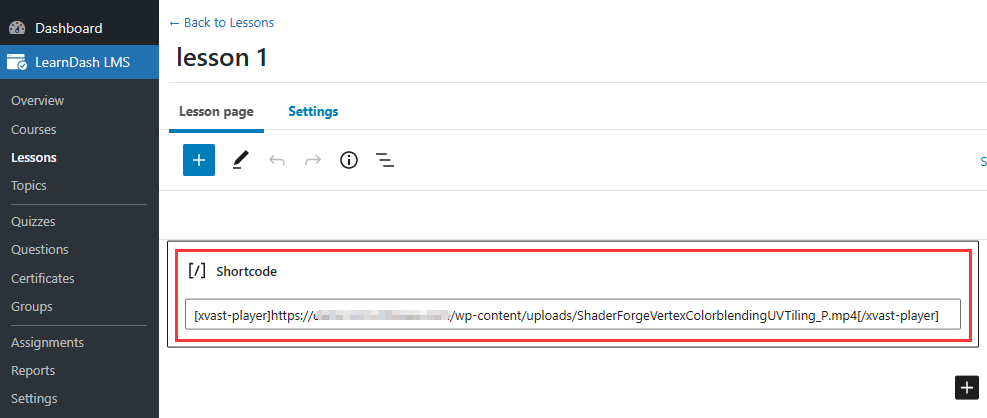
5. Embed the protected video
Embed the protected video into the LearnDash course. Create or edit a Lesson for a LearnDash course. Embed the encrypted video using the following shortcode. [xvast-player]https://www.domainname.com/videos/xxxxx_P.mp4[/xvast-player]
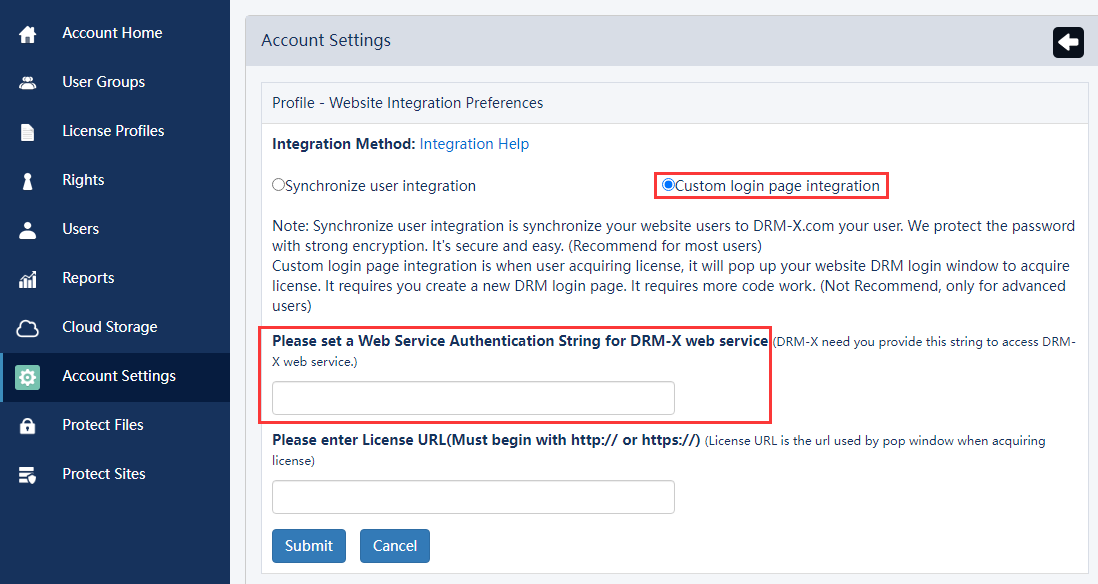
III. Set the URL of DRM-X 4.0 obtain license
Visit DRM-X 4.0 "Account Settings" – "Site Integration Preferences" - select "Custom Login Page Integration"
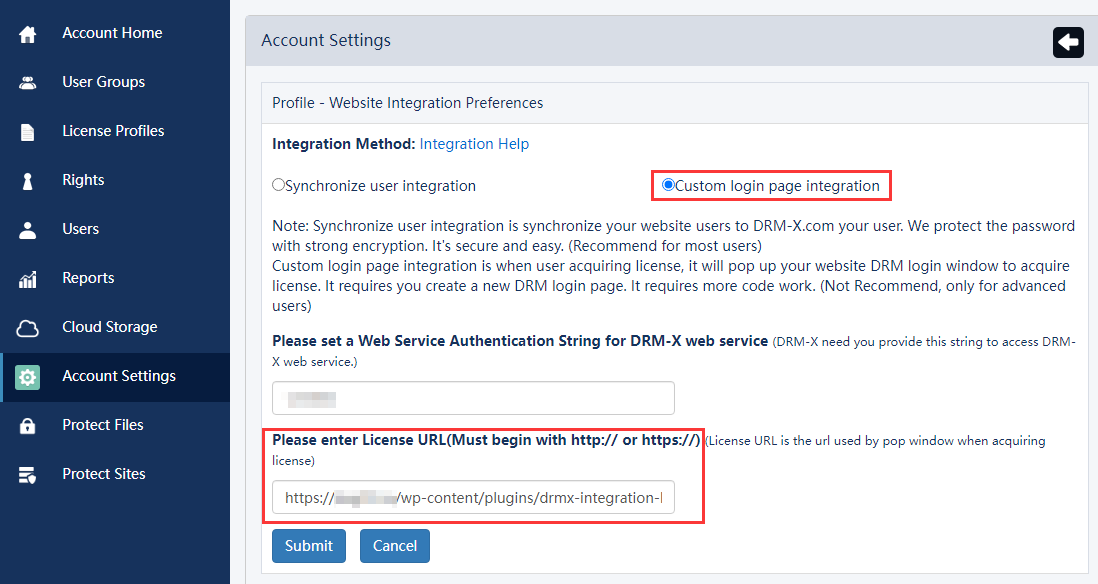
Set the License URL: The URL starts with the domain name of your WordPress site, for example: https://www.domain.com/wp-content/plugins/drmx-integration-learndash/drmx_index.php
You can also check the DRM-X 4.0 with LearnDash plugin page for a line of blue URL, which is the URL of your website to get the license.
If you have any questions about the integration, you can feel free to contact us.
Haihaisoft (DRM Provider) official website: https://www.haihaisoft.com
DRM-X Digital Rights Management Platform: https://www.drm-x.com
DRM-X Free Trial: https://www.drm-x.com/Fees-Compare-4.0.aspx
Other DRM-X 4.0 Tutorials
 DRM-X 4.0 Introduction Video
We through the Video show you the demo how to use DRM-X 4.0 platform, how to settings before encryption and How to encrypt video. We will show you how to play encrypted video.
WATCH NOW DRM-X 4.0 HTML web page encryption tutorial
With DRM-X 4.0, it encrypts web pages includes html, CSS, JavaScript and images, and control who can view your web content. It stops copying, prevent printing and print screen, and expires content when it should no longer be viewed.
WATCH NOW Xvast Windows Video Tutorial
We through the Video show you the demo how to download, install and use Xvast browser, how to open encrypted file and How to solve problems with use.
WATCH NOW DRM-X 4.0 Video Encryption Tutorial
We through the Video show you the demo how to use DRM-X 4.0 platform, how to settings before encryption and How to encrypt video. We will show you how to play encrypted video.
WATCH NOW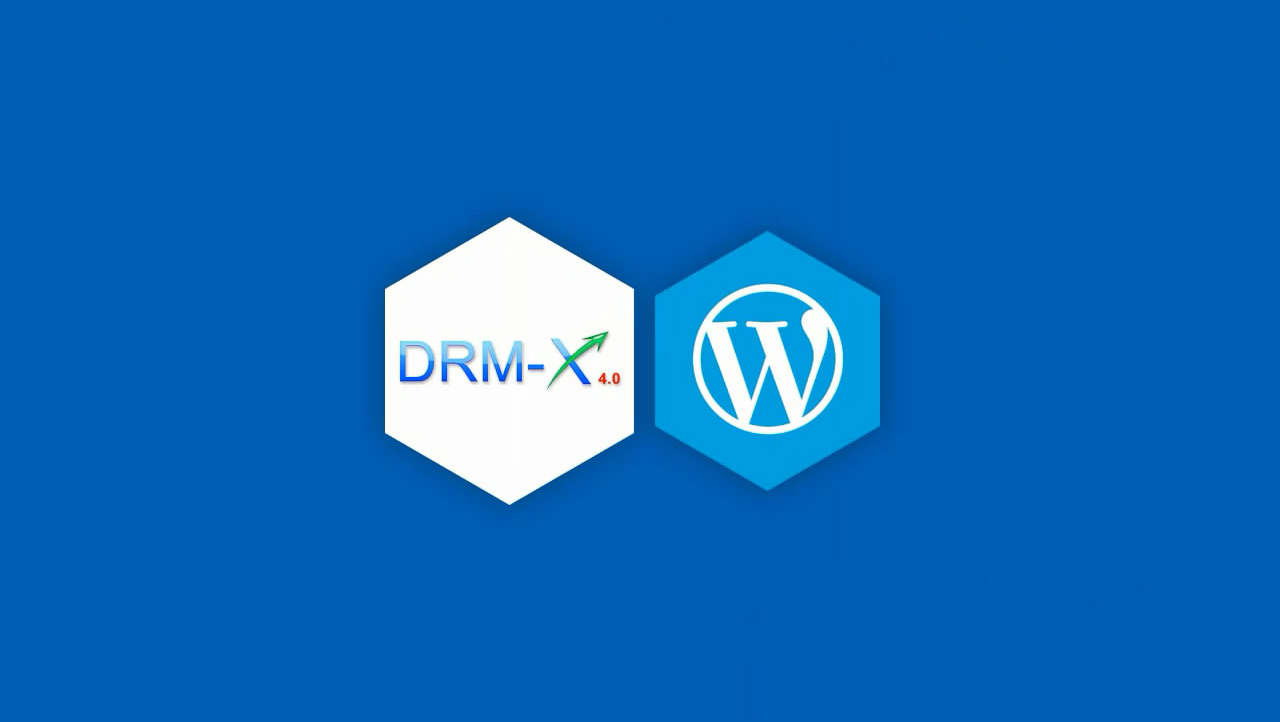 DRM-X 4.0 integration with WordPress
Custom login page integration is a customer ordered a protected content from your website, when customer plays the content, it will prompt your website customized login page, after customers input Username and Password of your websites account, they will get the license immediately to play the protected file. It requires you create a new DRM login page.
WATCH NOW DRM-X 4.0 Security Settings
When you use DRM-X 4.0 platform, there's something to notice. To make protection safer, please select a series of necessary options to prevent piracy. It's very important to do these settings in the beginning.
WATCH NOWQuestions?
Our reps have answers.
Ask about Haihaisoft products, pricing, implementation, or anything else — our highly trained reps are standing by, ready to help.
Tel: +64 27 507 9959 (New Zealand)
QQ: 1279126286 / 994184623
Contact us on Microsoft Teams
service#haihaisoft.com (replace # into @)
Contact Us