How to use Moodle to build a Website and seamlessly integrate with DRM-X 4.0 Course Encryption System
Moodle is a software with which you can build your own course website.The DRM-X 4.0 integration with Moodle is that when the user opens the protected file to obtain the license, the website will inspect whether or not he has the access to the course, so that you can verify if the customer can obtain the license and call the DRM-X license to send it to the customer.Finally, we'll embed a protected file into Moodle so that users can log into your site to view the course without extra validation.
1: Install Moodle and configure your website.
Download the latest moodle installation package from its official website, unzip it and upload it into your server. Follow the prompts to modify configuration and complete the installation including the establishment of moodle database. So you must have your own server and database. The demonstration below uses Apache and mysql constructed in local PC. There are many tutorials about moodle installation online, so we won't do more introduction here
After installation, and registered the administrator account. Then login to create your course.

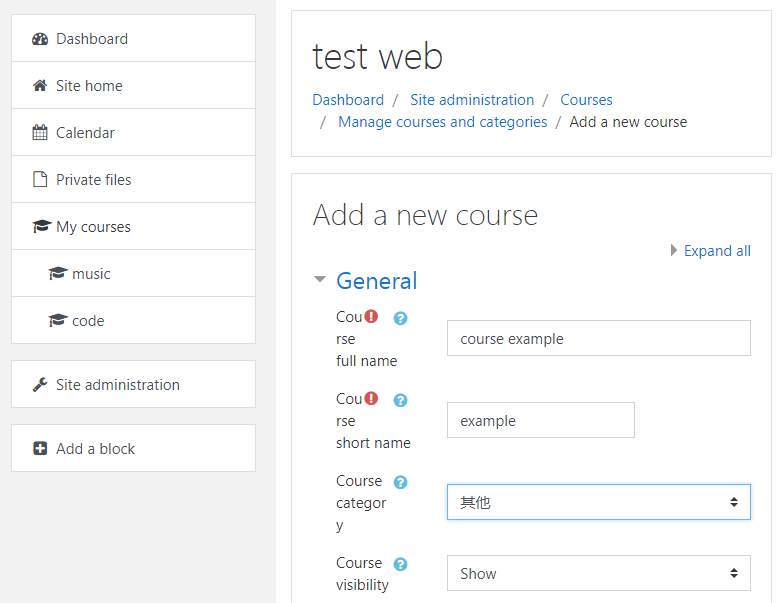
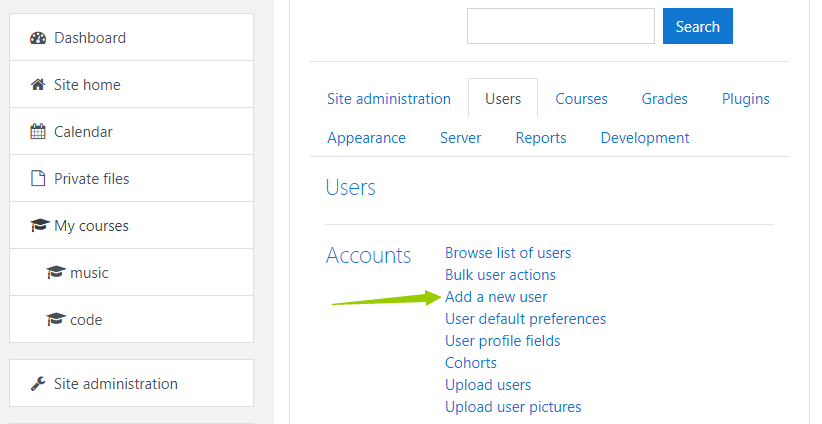
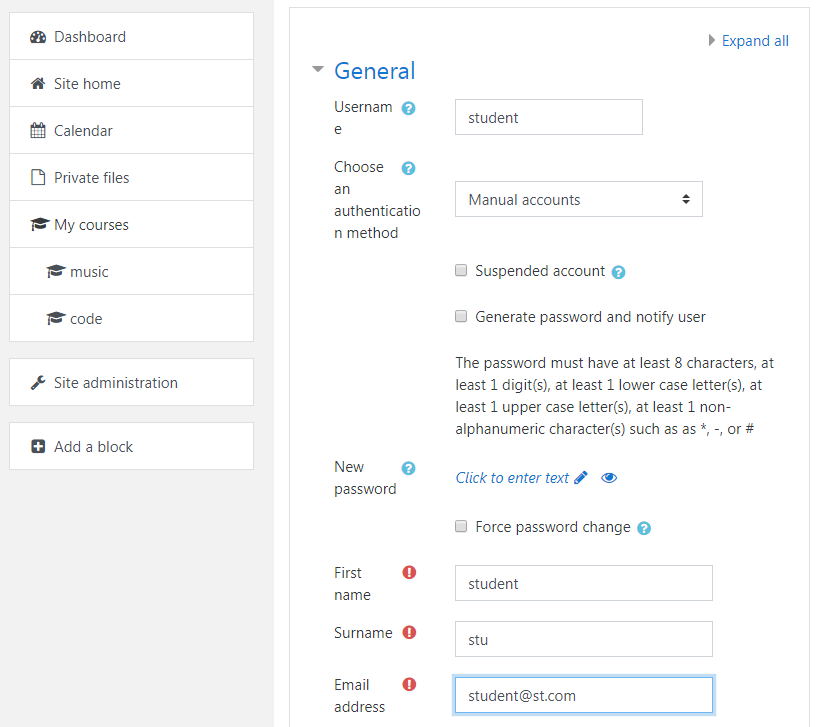
After create a course example, add user account for your student.
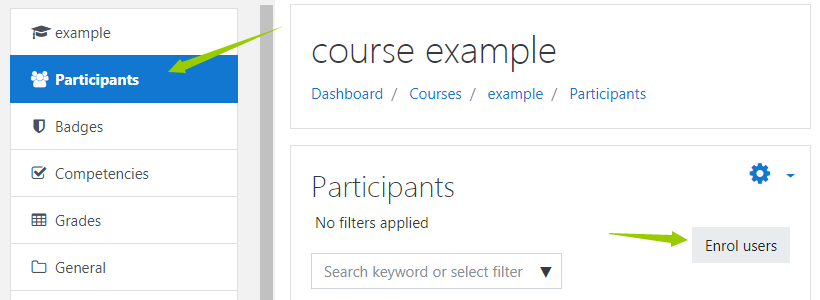
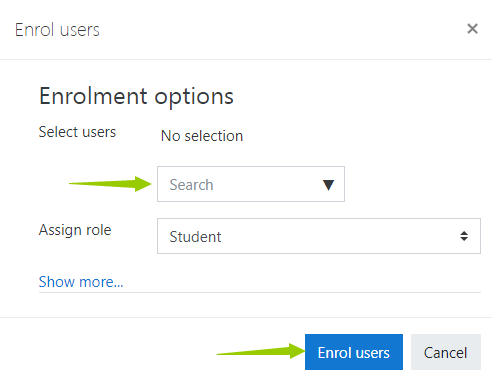
After add user account for your student, give your students the right to learn the 'course example'. In the 'Participants' ,click 'enrol users' to allows your student learn the course.
Here we completed a simple course creation and add a student user. Then we will add encrypted content to the blank course. We can encrypt some video, audio or pdf files by DRM-X 4.0 encryption platform, integrate DRM-X 4.0 with moodle and embed the encrypted files into moodle. It will make your students learn the course easily and securely.
2: Sign up for a DRM-X 4.0 account and encrypt your course.
Download the windows version of Xvast browser from Xvast official website: https://www.xvast.com. Open Xvast after installation.
To register a DRM-X 4.0 account through Xvast Browser, https://4.drm-x.com/register.aspx

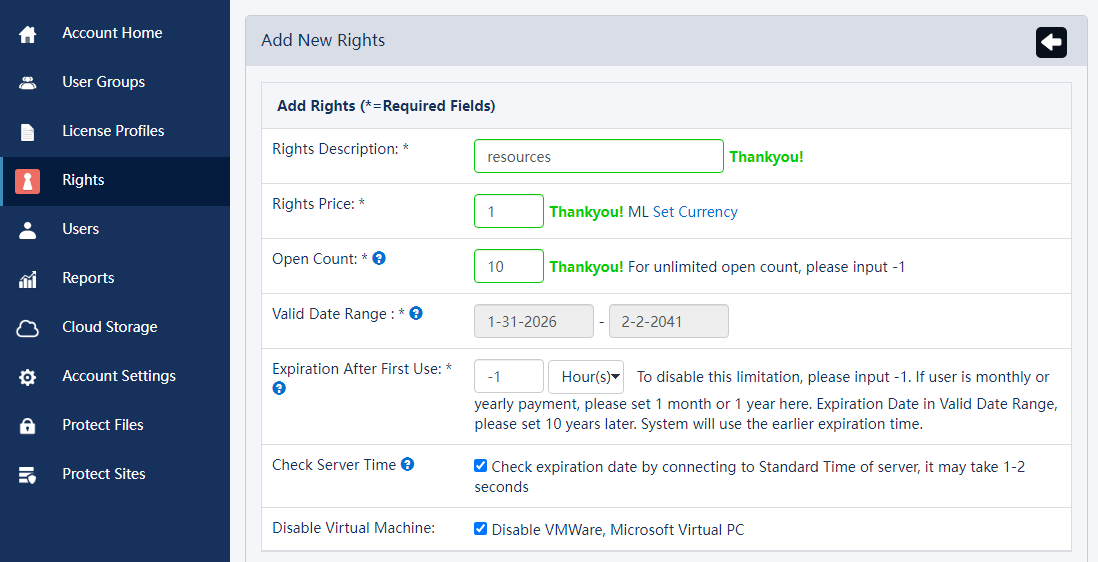
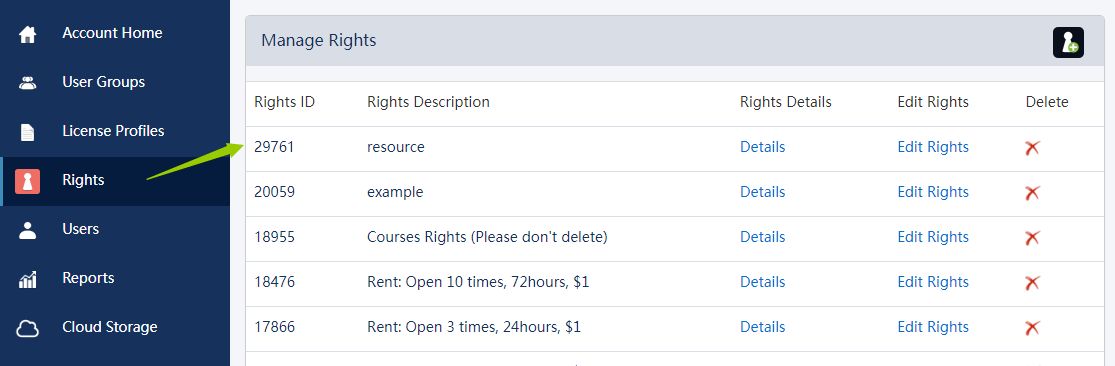
Login to the newly registered DRM-X 4.0 account, In the DRM-X 4.0 Control Panel, first we click "Rights" to add a new rights. Set Rights Description, Rights Price, Open count, Expiration After First Use, Protect document, Not Allow Print, enable watermark. You can set the watermark content to prevent piracy. Dynamic watermarking supports two modes of display. The first way is to set the watermark's position and frequency of change. The second type of watermark display is a marquee effect with a higher level of security.

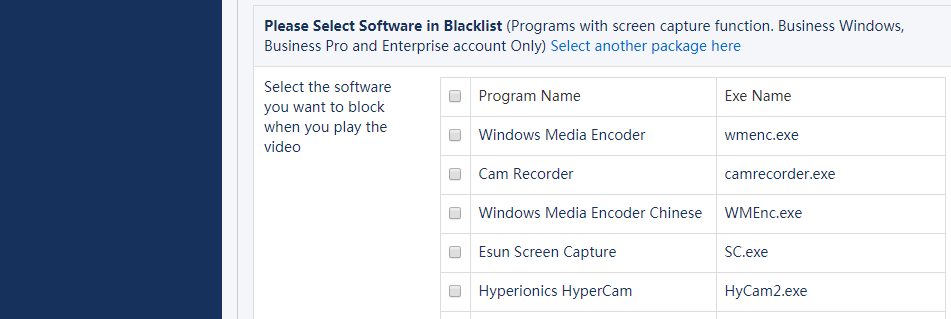
DRM-X 4.0 inherits 3.0's blacklist prevent screen recording feature. By setting the blacklist program, it can effectively prevent the blacklist from recording or screenshots. When the user opens the protected file, if the Xvast detects that a blacklist program is running, the Xvast will immediately block the blacklist process. Currently, the blacklist program contains hundreds of screen recording and screenshot programs.
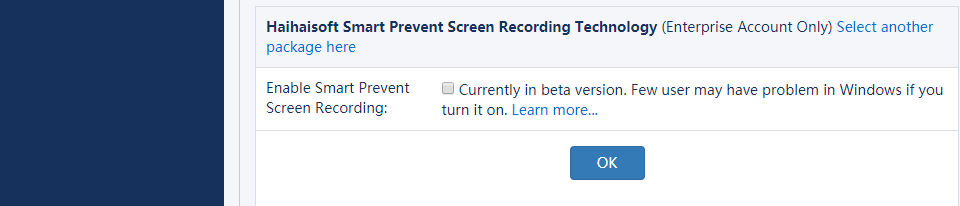
Haihaisoft provides the unique Smart Prevent Screen Recording Technology. It can automatically and effectively detect Screen Recording software in the market, even future Recording Screen software. It helps content providers better control the Rights of their DRM-X 4.0 protected content.
With these steps,we have got a custom license right.
And then let's add a new license profile which use the right we added above. We can encrypt files with this profile.
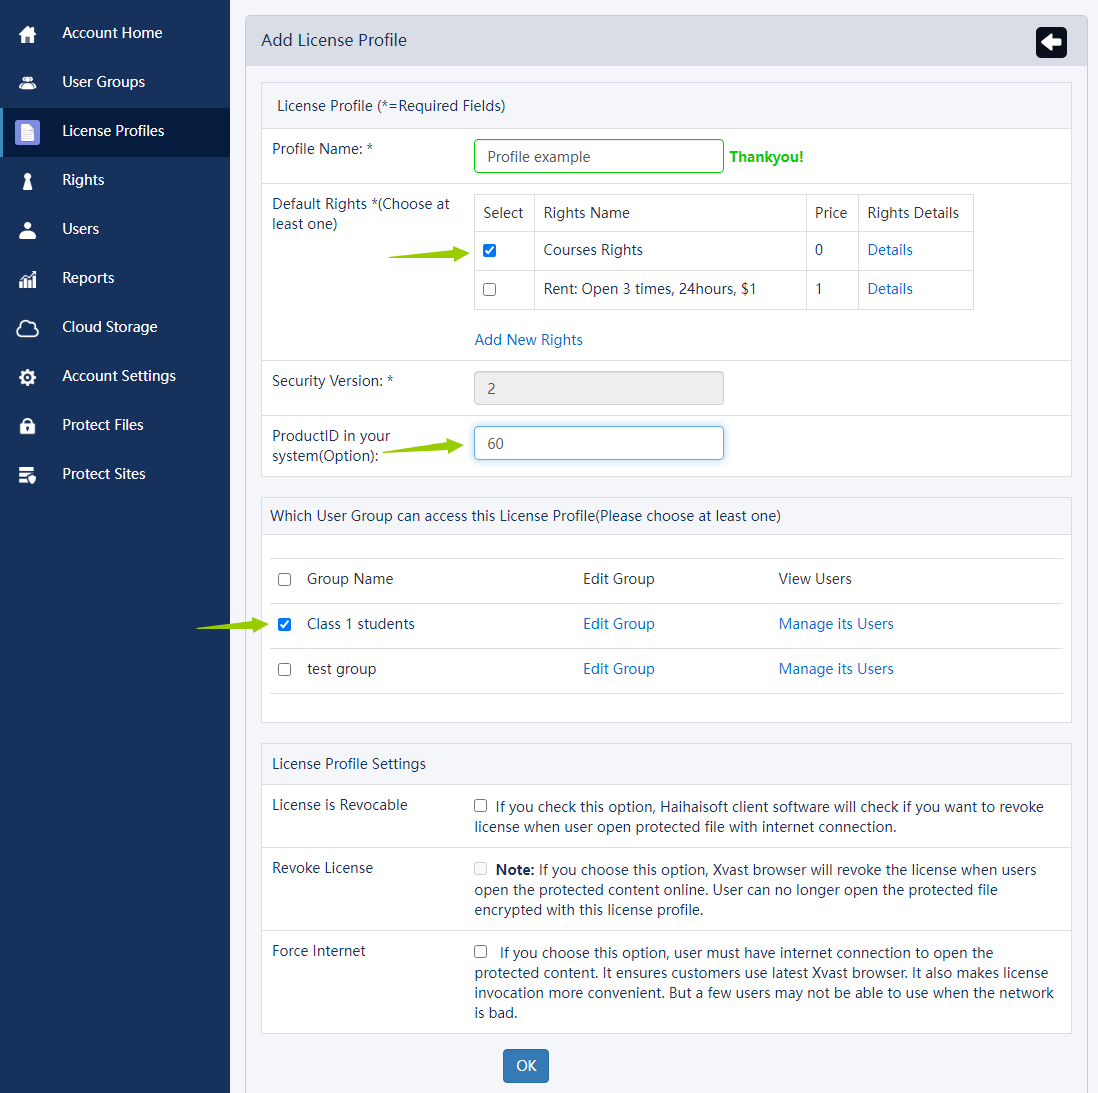
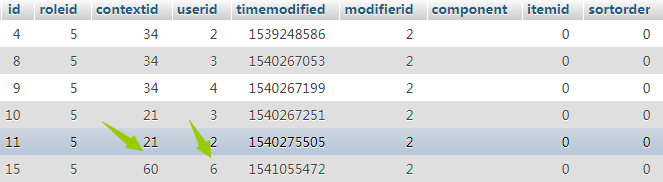
Which need to emphasize is that the value of 'productID in your system' must be same as your course ID in your own database. Generally students' course selection record is stored in the table "mdl_role_assignments". Here the course id of 'course example' is 56, so we must change the 'productID in your system' into 60. Furthermore, we can find that the user account whose userID is 6 have the right to learn the course.
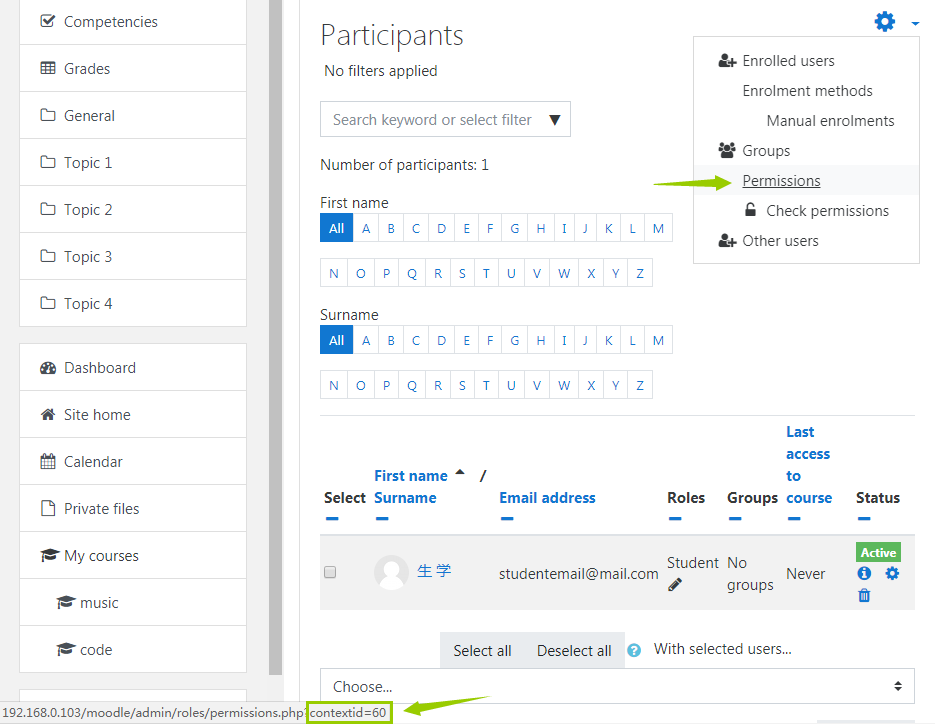
If you feel that looking for parameters in a lengthy database is too cumbersome, you can also find this parameter directly in the moodle account. Click Settings in the 'Participants' column of the course. Move your mouse over the permissions. You can find the URL in the lower left corner of the screen. The last number is the product ID of the course we are looking for.
Then we can encrypt files with the profile.
Click into the 'protect file', choose the right and license profile we added above.
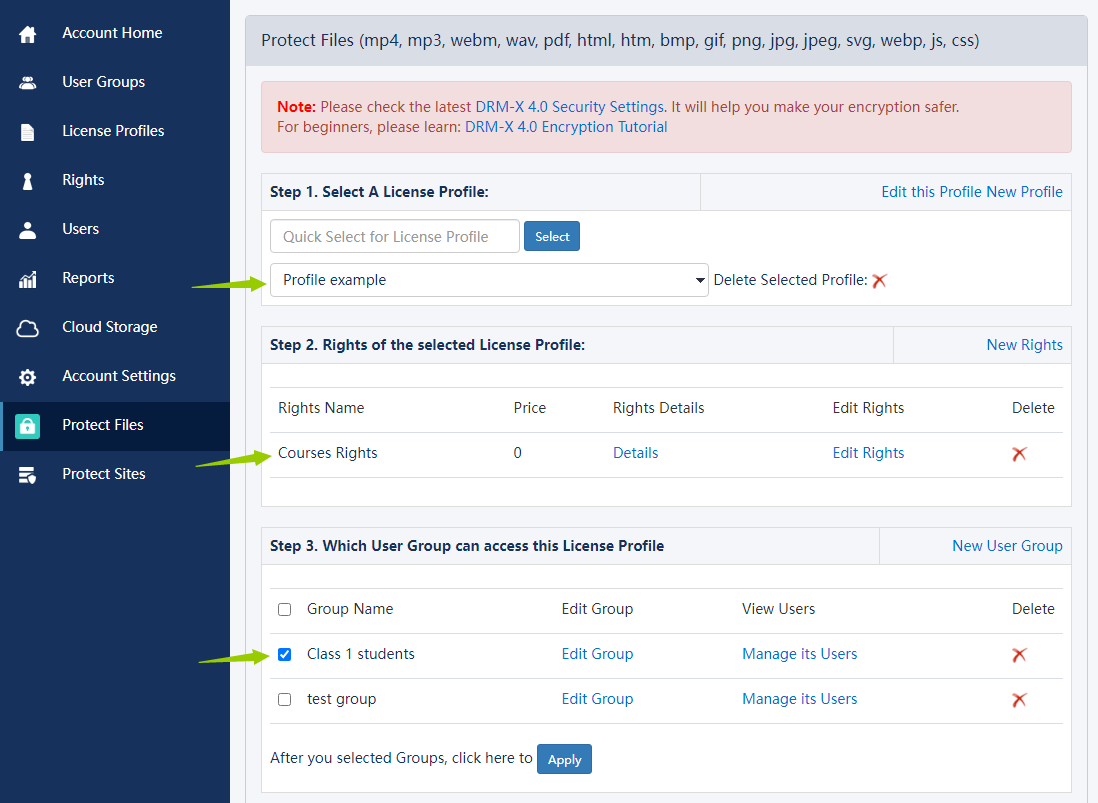
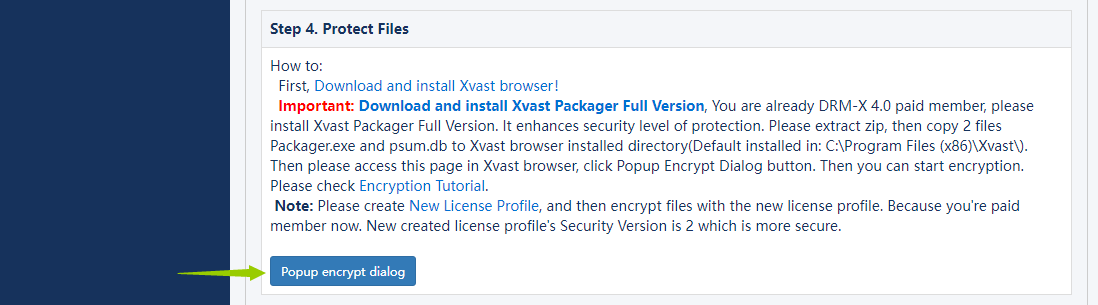
Choose the file you want to encrypt and click 'Start'.
Ok, now we have encrypted a video file. Other audio or pdf files all can be encrypted like this.
The detailed process of encryption can refer to the following tutorial:
Video encryption: https://www.drm-x.com/DRM-X4.0_encryption_tutorial.aspx
Web page Encryption:https://www.drm-x.com/DRM_web_page_html_encryption_tutorial.aspx
PDF encryption: https://www.drm-x.com/How_To_Encrypt_PDF.aspx
3: Integration between moodle and DRM-X 4.0.
Now we need to integrate DRM-X 4.0 with the moodle website. After integration, students who have selected your course will be able to view the encrypted content in the course by simply logging into your moodle website. Let's demonstrate the specific operation of the integration.
According to the sample code, you need to copy four pages named 'index.php', 'reindex.php', 'login.php' and 'licstore.php'. When the user opens the encrypted file, it will automatically jump to 'index.php' to check if he has logged into his moodle account. If not, jump to 'reindex.php' to login account. Otherwise, jump directly to 'login.php' to verify that the user's password is correct or not, whether user have the right to learn the corresponding course, etc. You can freely add and modify your verification code on this page. After that, if the user passes the verification, it will jump to 'licstore.php' to obtain the license and open the encrypted file.
In 'index.php', get the corresponding information of the encrypted file including profileid, clientinfo, rightsid, yourproductid, platform, contenttype, version, return_url. Store these parameters in the global variable $USER for later calls. Then determine if the user has logged into his moodle account.
require_once("../config.php");
$USER->ProfileID = $_REQUEST["profileid"];
$USER->ClientInfo = $_REQUEST["clientinfo"];
$USER->Platform = $_REQUEST["platform"];
$USER->ContentType = $_REQUEST["contenttype"];
$USER->ProductID = $_REQUEST["yourproductid"];
$USER->RightsID = $_REQUEST["rightsid"];
$USER->Version = $_REQUEST["version"];
$USER->Return_URL = $_REQUEST["return_url"];

if (isloggedin() or isguestuser()){
    echo "<script language=JavaScript>location='login.php';</SCRIPT>";
}else{
    echo "<script language=JavaScript>location='reindex.php';</SCRIPT>";
}
If the student hasn't logged into moodle, jump to 'reindex.php' ( It is not the initial login page of moodle, which allows users to obtain licenses to view encrypted files without logging into moodle.). Otherwise jump to login.php for specific verification.
If the user hasn't logged into moodle, you will need to verify the password. If the user has already logged into moodle, there is no need to verify the password.
if($_GET['un'] == 'login'){
	$username = $_REQUEST["username"];
	$pwd = $_REQUEST["password"];

	/****** verify the password *******/
	$result = mysqli_query($dbcon,"SELECT ID,password,email FROM mdl_user WHERE username ='" .$username. "'");
	$row = mysqli_fetch_array($result, MYSQLI_ASSOC);
	$email = $row['email'];
	$t_hasher = new \PasswordHash(8, FALSE);
	$newpwd= $t_hasher->CheckPassword($pwd, $row['password']);
	if ($newpwd != true ) {
		$info = "Your Account or Password is incorrect! <br><br>Please revisit the course!";
 	}else{
		$ username			= $username;
		$_SESSION['pwd']	= $pwd;
		$ userid			= $row['ID'];
		$ userEmail 		= $email;
	}
/** **/
// If the user has already logged into moodle, there is no need to verify the password.
}else{
	$username = $USER->username;
	$userEmail = $USER->email;
	$userid = $USER->id;
}
Then verify whether the user has permission to learn the course. If the verification is passed, save the user information to the DRM-X 4.0 account, then obtain the license and jump to next page to open the encrypted file. Note that the red code below needs to be changed to your DRM-X 4.0 account , the Web Service Authentication String you set(This will be demonstrated below) and the GroupID.
// Query the order based on the user ID
$id_query = mysqli_query($dbcon,"SELECT id FROM mdl_user WHERE username='" .$username. "'");
$id_row = mysqli_fetch_array($id_query, MYSQLI_ASSOC);
$id_result = $id_row['id'];

$courseid_query = mysqli_query($dbcon,"SELECT contextid FROM mdl_role_assignments WHERE userid='" .$id_result. "'");
while($courseid_row = mysqli_fetch_array($courseid_query, MYSQLI_ASSOC)){
	$courseid_result = $courseid_row['contextid'];
	if ($courseid_result == $USER->ProductID){
		/******* Check whether the user exists on the DRM-X platform********/
		$wsdl="http://4.drm-x.com/haihaisoftlicenseservice.asmx?wsdl";
		$CheckUser_param = array(
			'UserName' 				=> $username,
			'AdminEmail' 			=> 'yourEmail@163.com', //your DRM-X 4.0 account
			'WebServiceAuthStr' 	=> 'aaaaaa', // the Web Service Authentication String you set in DRM-X 4.0 background
		);

		$client = new nusoap_client($wsdl, 'wsdl');
		$client->soap_defencoding = 'UTF-8';
		$client->decode_utf8 = false;
		$CheckUser = $client->call('CheckUserExists', array('parameters' => $CheckUser_param), ', ', true, true);

		$CheckUser_result = $CheckUser['CheckUserExistsResult'];
		/*** End detecting whether the user exists **/

		//If the username is not exists, call "AddNewUser" to add user.
		if($CheckUser_result == "False"){
			$add_user_param = array(
				'AdminEmail' 		=> 'yourEmail@163.com',// your DRM-X 4.0 account
				'WebServiceAuthStr' => 'aaaaaa',// the Web Service Authentication String you set in DRM-X 4.0 background
				'GroupID' 			=> '11726',//GroupID
				'UserLoginName' 	=> $username,// Username or ID
				'UserPassword' 		=> 'N/A',
				'UserEmail' 		=> $userEmail,
				'UserFullName' 		=> 'N/A',
				'Title' 			=> 'N/A',
				'Company' 			=> 'N/A',
				'Address' 			=> 'N/A',
				'City' 				=> 'N/A',
				'Province' 			=> 'N/A',
				'ZipCode' 			=> 'N/A',
				'Phone' 			=> 'N/A',
				'CompanyURL' 		=> 'N/A',
				'SecurityQuestion' 	=> 'N/A',
				'SecurityAnswer' 	=> 'N/A',
				'IP' 				=> getIP(),//
				'Money' 			=> '0',//
				'BindNumber' 		=> '2',//
				'IsApproved' 		=> 'yes',//
				'IsLockedOut' 		=> 'no',//
			);

			$add_user = $client->call('AddNewUser', array('parameters' => $add_user_param), ', ', true, true);
			$result = $add_user['AddNewUserResult'];
		}
		/*** Successfully added new users ***/
		/***** obtain a license after the license authority is updated ****/
		$param = array(
		  'AdminEmail' 			=> 'yourEmail@163.com',// your DRM-X 4.0 account
		  'WebServiceAuthStr'  => 'aaaaaa',// the Web Service Authentication String you set in DRM-X 4.0 background
		  'ProfileID'          => $USER->ProfileID,
		  'ClientInfo'         => $USER->ClientInfo,
		  'RightsID'           => $USER->RightsID,
		  'UserLoginName'      => $username,
		  'UserFullName'       => 'N/A',
		  'GroupID'            => 11726,//GroupID
		  'Message'            => 'N/A',
		  'IP'                 => getIP(),
		  'Platform'           => $USER->Platform,
		  'ContentType'        => $USER->ContentType,
		  'Version'            => $USER->Version,
		);

		$client = new nusoap_client($wsdl, 'wsdl');
		$client->soap_defencoding = 'UTF-8';
		$client->decode_utf8 = false;
		/***** Obtain a license by calling the getLicenseRemoteToTableWithVersion method ******/
		$result = $client->call('getLicenseRemoteToTableWithVersion', array('parameters' => $param), ', ', true, true);
		$license = $result['getLicenseRemoteToTableWithVersionResult'];
		$message = $result['Message'];

		if(stripos($license, ' <div id="License_table_DRM-x4" style="display:none;">' )  === false )
		  echo "<SCRIPT language=JavaScript>'location='LicError.php?error=".$license."&message=".$message."';</SCRIPT>";
		/***** After obtaining the license, store the license and message into $USER, then jump to the licstore page. ******/
		$USER->license = $license;
		$USER->message = $message;
		 echo "<SCRIPT language=JavaScript>location='licstore.php';</SCRIPT>";
		$flag = 1;
		$info = "Getting license...";
		exit;
	}
}
Here is just the simplest example verification. If you have more feature plugins installed in moodle, such as courses purchasing, fees paying, etc., you also need to include the verification about whether student has submitted orders, whether the payment is completed or not in the code.
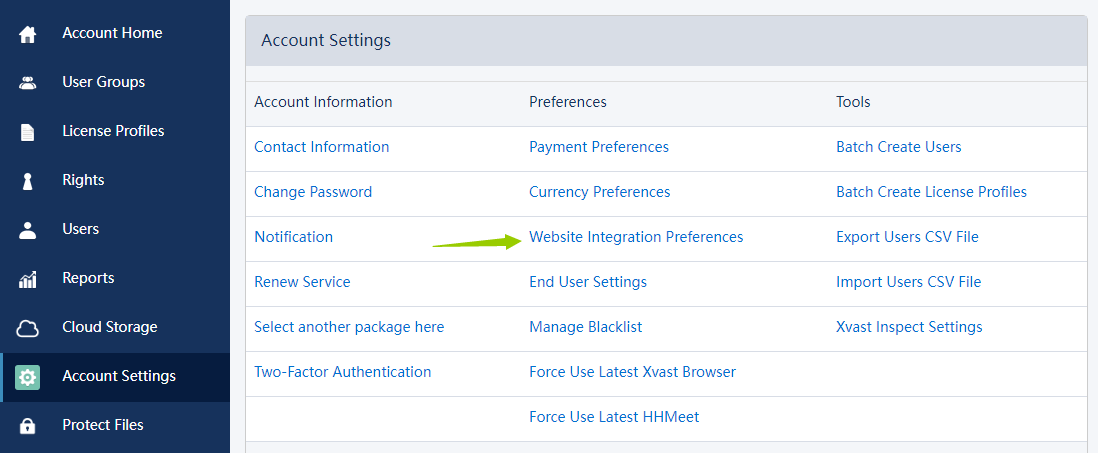
Enter the account setting options of the DRM-X platform again, and click in 'Website Integration Preferences' then 'Custom login page integration'. Fill in the 'Web Service Authentication String' and ‘License URL'. After the user opens the encrypted file, it will jump to your moodle integration page for verification.

Now we basically completes the integration of DRM-X with our moodle website. Then you can simply send the encrypted file to your students and they should open it in the Xvast browser. But those who do not have access to your course will not be able to view the encrypted file even though they get the file.
Also you can embed encrypted files directly into your moodle page so that your students can browse and learn your course directly on your website.
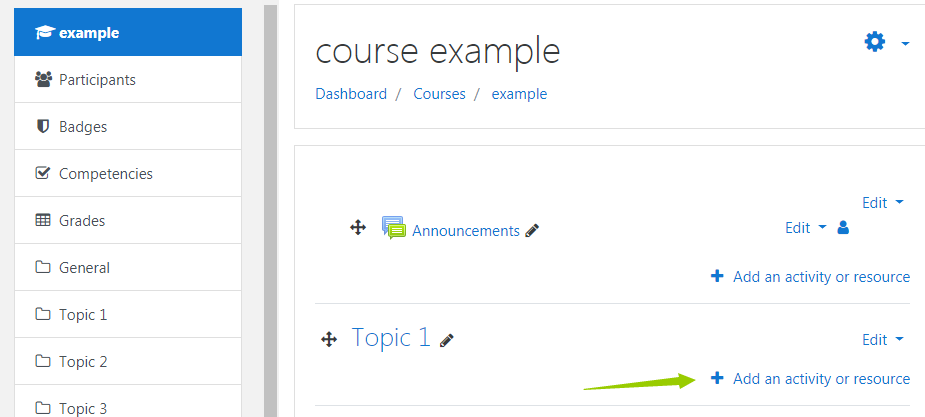
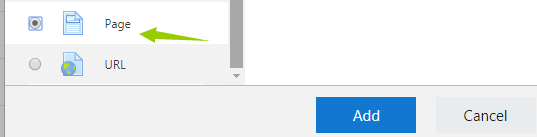
Add an activity or resource to topic 1 of 'course example' you just created and select the page.
As shown below, add the embed code in the html column. The embed code has been saved in the sample code folder, and you just need to modify red url below to the url of your encrypted file.
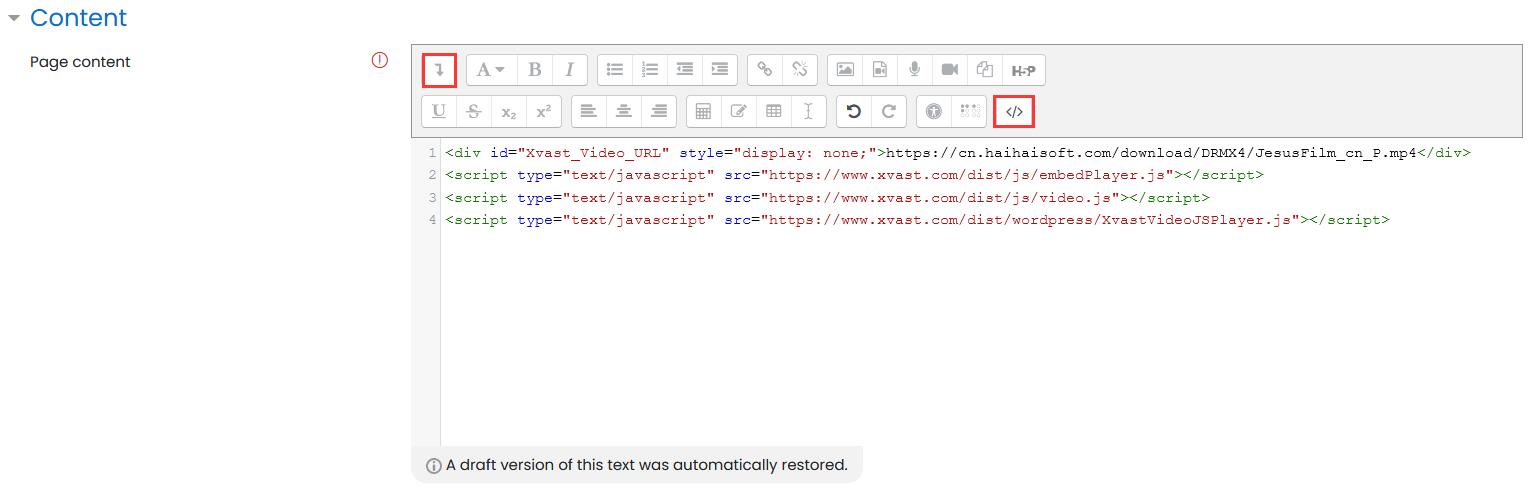
'<'div id="Xvast_Video_URL" style="display: none;"'>'https://www.drm-x.com/download/drmx4/Way_Maker_720P_P.mp4'<'/div'>'
'<'script type="text/javascript" src="https://www.xvast.com/dist/js/embedPlayer.js"'><'/script'>'
'<'script type="text/javascript" src="https://www.xvast.com/dist/js/video.js"'><'/script'>'
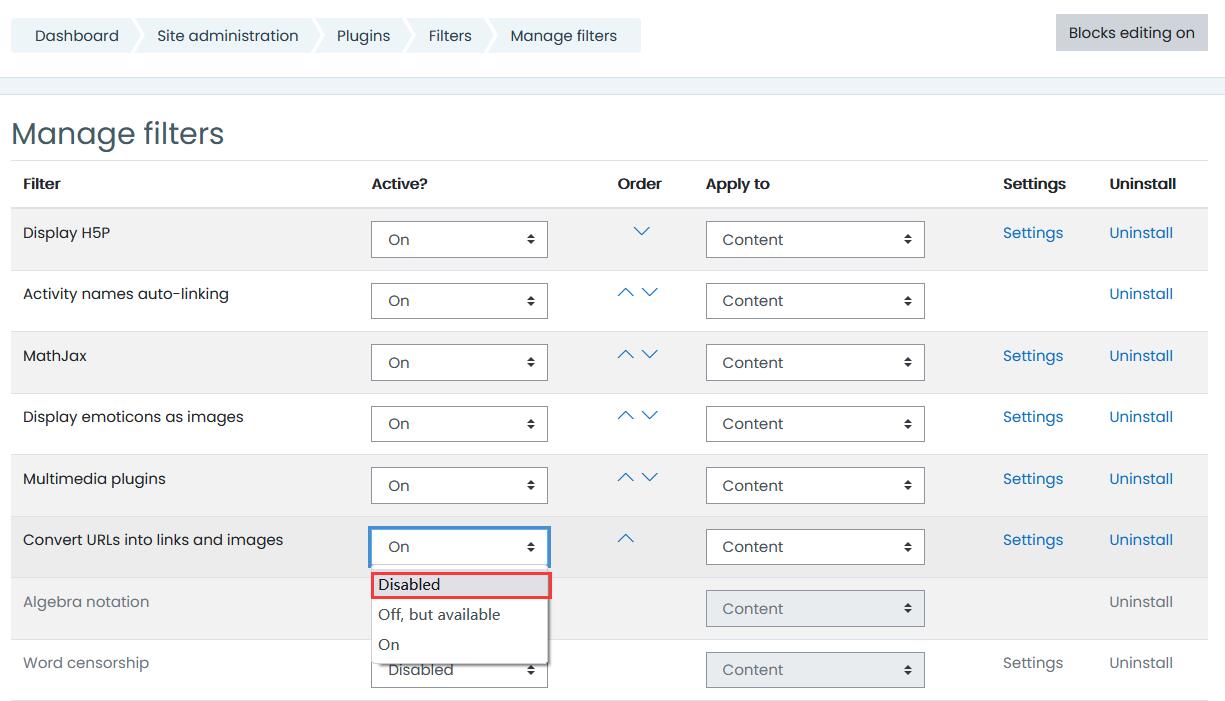
'<'script type="text/javascript" src="https://www.xvast.com/dist/wordpress/XvastVideoJSPlayer.js"'><'/script'>'Please check and disable the "Convert URLs into links and images" setting in your website settings (Dashboard--Site administration--Plugins--Filters--Manage filters). As shown below:
4: Play your course.
You can play your course after the integration is completed. Open your website in Xvast browser and login with student account. Then open the "Course example" and Xvast will automatically get the license and play the encrypted content.
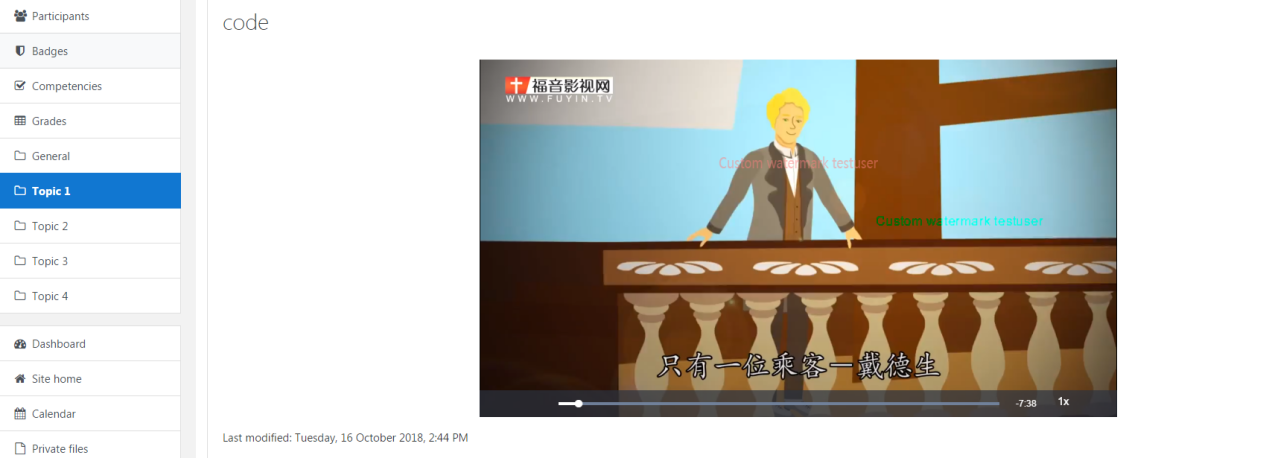
After embedding the code, it will show the video like this. There will be two watermarks moving when the video is playing. You can customize the content of the watermark to prevent from being recorded. In addition, DRM-X 4.0 also has blacklist and smart prevent screen recording technology to prevent malicious recording or screen captures. Students who participate in the course can play its encrypted video directly.
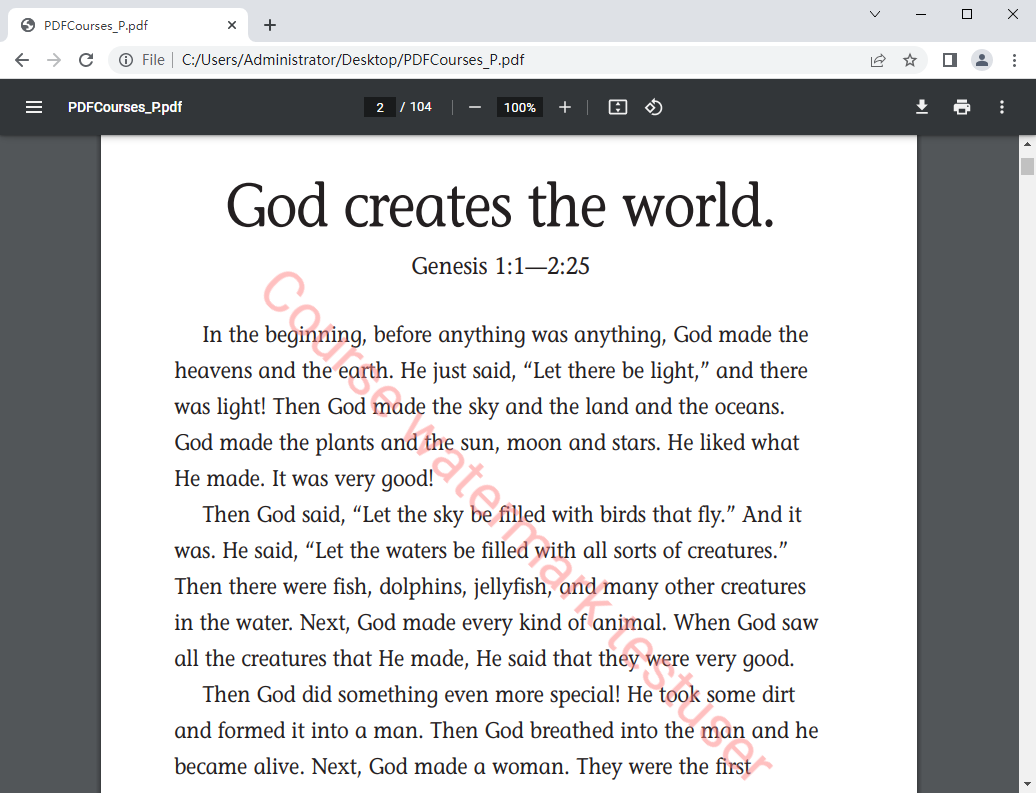
Similarly, you can add your encrypted pdf file link directly to your course page. Your students can get license to read the content. The watermark can prevent your encrypted PDF from malicious screen capture, because the content in the watermark will reveal the personal information of the user who transmitted the source.
So far, we have introduced how to build a teaching website based on Moodle, how to encrypt files with DRM-X 4.0 and how to integrate DRM-X 4.0 with Moodle. With this features, your students can easily view your encrypted files while you can also get rid of the piracy problems about transferring or selling your course.
Other DRM-X 4.0 Tutorials
 DRM-X 4.0 Introduction Video
We through the Video show you the demo how to use DRM-X 4.0 platform, how to settings before encryption and How to encrypt video. We will show you how to play encrypted video.
WATCH NOW DRM-X 4.0 HTML web page encryption tutorial
With DRM-X 4.0, it encrypts web pages includes html, CSS, JavaScript and images, and control who can view your web content. It stops copying, prevent printing and print screen, and expires content when it should no longer be viewed.
WATCH NOW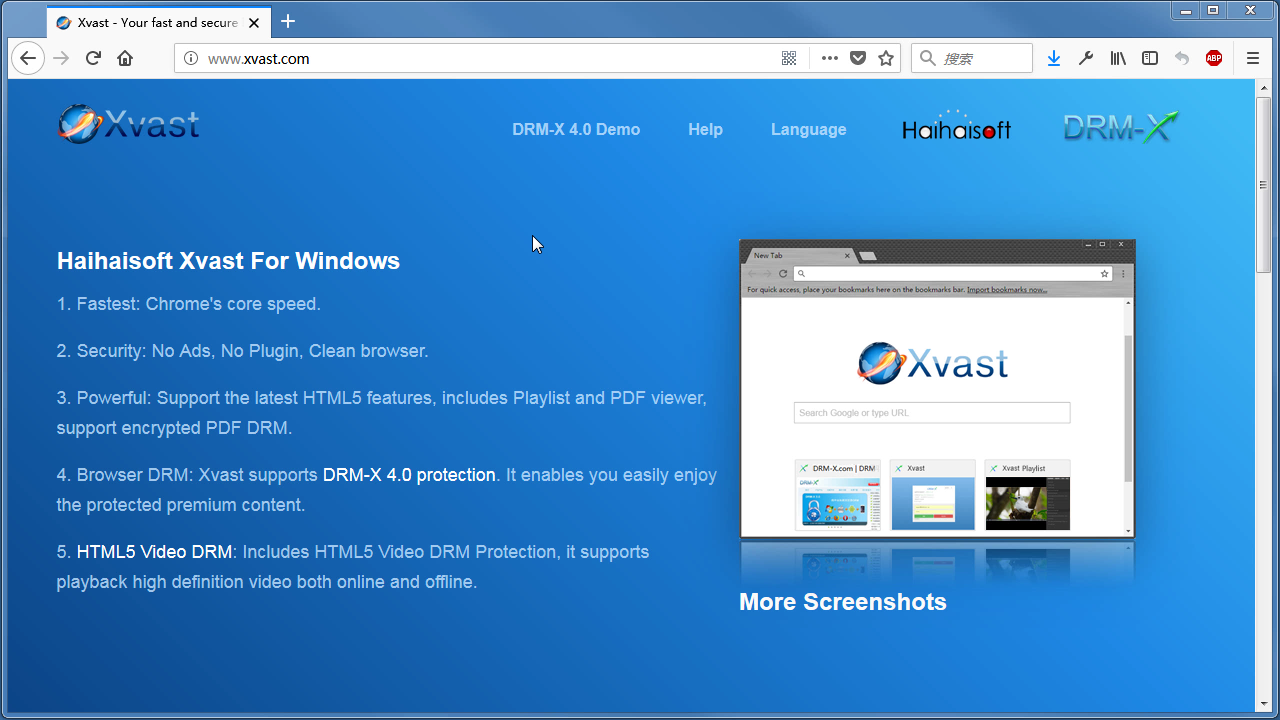 Xvast Windows Video Tutorial
We through the Video show you the demo how to download, install and use Xvast browser, how to open encrypted file and How to solve problems with use.
WATCH NOW DRM-X 4.0 Video Encryption Tutorial
We through the Video show you the demo how to use DRM-X 4.0 platform, how to settings before encryption and How to encrypt video. We will show you how to play encrypted video.
WATCH NOW DRM-X 4.0 integration with WordPress
Custom login page integration is a customer ordered a protected content from your website, when customer plays the content, it will prompt your website customized login page, after customers input Username and Password of your websites account, they will get the license immediately to play the protected file. It requires you create a new DRM login page.
WATCH NOW DRM-X 4.0 Security Settings
When you use DRM-X 4.0 platform, there's something to notice. To make protection safer, please select a series of necessary options to prevent piracy. It's very important to do these settings in the beginning.
WATCH NOWQuestions?
Our reps have answers.
Ask about Haihaisoft products, pricing, implementation, or anything else — our highly trained reps are standing by, ready to help.
Tel: +64 27 507 9959 (New Zealand)
QQ: 1279126286 / 994184623
Contact us on Microsoft Teams
service#haihaisoft.com (replace # into @)
Contact Us